Fieldwork: The Ground Truth
Have you ever wonder what happens before the maps and detailed reports are made? I can say that it starts with (someone) getting your hands dirty! In geospatial analysis—especially in agriculture and environmental work—collecting accurate data directly from the field isn’t just a step, it’s the foundation of everything. This text start to dive into the practical world of fieldwork, exploring the tools and workflows I use to capture the “ground truth” that no satellite image can fully replace.
Collecting Data in the Field
Context
Let’s start talking about field data collection, since this is a critical step because the quality of all your subsequent analysis and reporting depends directly on it. In the fields of agriculture, environmental science, and similar areas, the need for field data is almost always a rule. What isn’t always standard, however, is how we obtain that data, and that’s my focus here.
Think about it: when you work exclusively as a data analyst (as I did for a few years), the data usually “arrives” ready for you (I’m not discounting the immense work involved in research, finding appropriate sources, and efficient distribution—that’s a lot of work in itself!). What I mean is that you usually aren’t involved in the data’s origin.
In my current situation, I have also the responsibility of properly collecting the data, meaning I have an active role in the entire data genesis. This is interesting and different from what I was used to, and it brings a huge responsibility regarding the data’s legitimacy and ensuring it accurately represents the information you need. Note: This doesn’t apply to all data, as I still acquire remote sensing data, for example.
Disclaimer: This describes how I am currently working. This may change. Factors like my current knowledge, team interaction, and familiarity with the tools are all part of deciding which option to use.
Introduction
For certain types of rural property assessments, some necessary outputs are maps. These maps provide crucial support for a range of vital assessment information, including location and distance of key features, location of similar properties in the region, land capability classes, slope, land use/occupation classes, and more.
While remote data is important (and necessary, like using a DEM), adequately recorded field data is supreme. After all, the truth on the ground is unique and irreplaceable in many cases.
Here’s an example: a property needs to be inspected and have its value assessed (land and its improvements). Some common issues in this type of work are:
–> Can you use only a soil map to indicate land capability classes? Yes, you can. But you will certainly miss details that you can only see in the field (and you can get from registering while you’re in the field), such as soil patches and other particularities that can heavily impact the total value, depending on the size of the property.
–> Can you use a high-resolution image (like Google Satellite) to estimate the size of things like houses, reservoirs, water tanks, lighting poles and others? Maybe for a few of them, depending on the structure’s size. But you definitely miss important assessment components like the state of conservation. Not to mention that adequate identification via satellite image might not even be possible, depending on the size and shape of the improvement.
–> Another example: fences. You need to record characteristics in the field, such as the fence material (type of wood) and its state of conservation. You also need to mark points where fences exist, where they don’t, etc.
–> Other relevant points: the hydrographic network obtained from a local environmental agency might not show the correct location of all water courses or even the presence of every one. By observing in the field and using a good DEM, and high resolution satellite image, you can correctly add or adjust these features in their proper locations. This is hugely important because water bodies also impact the valuation of rural properties.
Note: Using drones could solve some of these issues. But even then, you still need to go to the area, and you’ll likely still do some checks in person. I believe that in this specific case, a drone would make the work much more efficient.
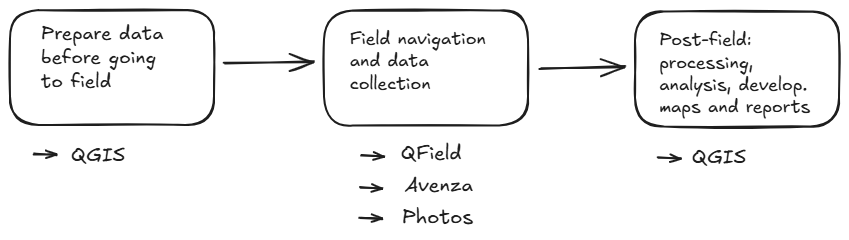
Available Tools
When talking about relatively simple field data collection—marking and identifying points of interest (with or without photos) and tracking the route taken (on foot or in a vehicle)—as well as using tools for navigation, these are the ones I’m currently utilizing in my workflow:
-
Avenza
-
QField
-
Geolocated Photos
Field Work Flow
The exact use of these tools depends on individual or team organization. Here’s how I approach it:
QField: I use this for the main map display, including high-resolution satellite imagery, property boundaries, and other relevant targets like roads, hydrography, and public land. I use this map for navigation because it maintains good resolution. However, in my experience, zooming in too much on a cell phone can sometimes cause the image to load slowly. I dedicate one device exclusively to this navigation map and use a separate device for marking points and recording information.
Avenza: I create an identical version of the map above, but as a GeoPDF. Resolution is usually slightly reduced here so that the file isn’t too large. There is also the limitation of what “fit” into the PDF file, so if you’re very far from your area of interest, you won’t be on the map. On the flip side, you get a very light and practical file that’s easy to use and share. I use Avenza to mark points of interest and record very brief, relevant information. I take photos at some of the points. When passing through unknown or enclosed areas where the return path is unclear or hard to check later on a satellite image, I use the tracking tool. I try to limit the use of Avenza only to what is inside my area of interest, such as the rural property itself.
Geolocated Photos: For certain parts of the work, I need to document specific locations that are not inside my area of interest, such as properties that will serve as comparative elements for research. Here, I take photos using the native phone camera app, ensuring geolocation logging is enabled, and then save them to correctly identified folders.
What’s Best?
As you might imagine, it depends. It depends on your objective, your familiarity with the tools, whether other people will share the project (and their knowledge of the tools), and so on.
It’s worthwhile to continuously test and adjust along the way, striving for continuous improvement. It’s important to become familiar with what each tool allows you to do and to be very clear about what each one can deliver.